Add a Facebook Like/Fan box to Blogger
Update Sept. 2010:
Facebook replaced the input Facebook Page ID with Facebook Page URL. This tutorial has been revised accordingly.
Here is a tutorial on adding a Facebook Like box (formerly a Fan box) to Blogger/blogspot. It’s a good way to promote your Facebook page. A Like box lets your readers:

- See how many users already Liked your page.
- Like your Facebook page with just one click, without having to visit the page.
- Read your page’s recent posts (if you choose to display them).
(Looking for Like button instead? Learn how to Add Facebook Like button here)
Now let’s proceed shall we?
I) Get your Facebook page ID URL
- Visit Facebook and go to your page.

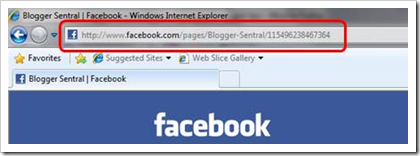
- Copy the
IdURL from your browser’s address bar.It’s at the end of the url.Trim the URL until you get something like this:http://www.facebook.com/pages/Blogger-Sentral/115496238467364
[http://www.facebook.com/pages/PAGE-NAME/PAGE ID]
II) Configure your Like box
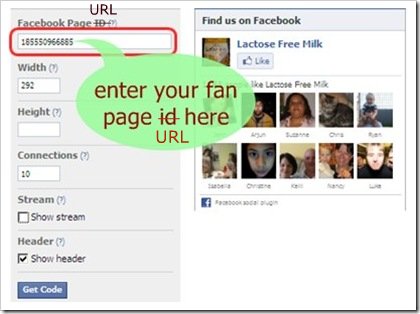
- Go to Facebook Like box configuration page (opens in a new tab/window). You will see a configuration box, like this (Facebook has replaced Facebook Page ID with Facebook Page URL):

- Now paste your page
IDURL inside the Facebook PageIDURL text box. - Set other parameters such as width, height and stream. The Preview on the right will update itself as you enter the changes.
- Click Get Code button when done. You’ll be given two codes, titled iframe and XFBML. You only need the iframe code.
- The iframe code should look more or less like this (do not copy this code):
<iframe src="http://www.facebook.com/plugins/likebox.php?href=http%3A%2F%2Fwww.facebook.com%2Fpages%2FBlogger-Sentral%2F115496238467364&width=292&connections=10&stream=false&header=true&height=280" scrolling="no" frameborder="0" style="border:none; overflow:hidden; width:292px; height:280px;" allowTransparency="true"></iframe>
Update February 2011:
It seems Facebook (perhaps erroneously) has the box height fixed to 62px. This allows only your Facebook page title and the Like button to appear inside the box. The faces will be hidden. To show them, you must increase the height. For example, to show two rows of faces, change theheightto 280px. There are twoheightsin the code, make sure you change both. - Copy the code (the code provided by Facebook, not the sample code in no.5).
- In Blogger, go to Layout and click a Add-A-Gadget link. Select HTML/Javascript gadget and paste the code in the content box.
- Save and view your blog.
- Enjoy!


214 comments to "Add a Facebook Like/Fan box to Blogger"
«Oldest ‹Older 201 – 214 of 214 Newer› Newest»
-
Unknown,
March 16, 2013 at 2:58 AM
-
-
-
Tracie,
March 19, 2013 at 1:34 AM
-
-
-
Orjen,
April 3, 2013 at 8:50 PM
-
-
-
Saami,
April 10, 2013 at 7:47 PM
-
-
-
Hank,
April 17, 2013 at 2:23 PM
-
-
-
pradeff,
April 29, 2013 at 7:10 PM
-
-
-
For The Love Of Fiction,
April 30, 2013 at 3:41 AM
-
-
-
lexaragon,
May 22, 2013 at 7:30 PM
-
-
-
Himanshu Shrivastava,
June 2, 2013 at 6:14 PM
-
-
-
The Forever Explorer,
July 14, 2013 at 7:12 PM
-
-
-
Unknown,
August 3, 2013 at 3:08 PM
-
-
-
Inderjeet Singh,
September 2, 2013 at 6:16 PM
-
-
-
Rahul Askar,
October 6, 2013 at 3:27 PM
-
-
-
heba mohammed,
December 9, 2013 at 1:59 AM
-
-
«Oldest ‹Older 201 – 214 of 214 Newer› Newest»thanks man been trying out other codes and editing template html etc as misled by others but this one was much more easier thanks a ton
keep it up (y)
thank you, very helpful. I had people visiting my blog and visiting my facebook. But this helped add the like button
Thank God! I've found all sorts of crap whilst looking for this but this is exactly what I needed. Thanks!
Gr8 It Works!! Just have to unselect send button
Man, this worked perfect! I've been trying to get the "like" box on my blog for a really long time and finally, with this tutorial, got it to work. Thanks so much!
thanks a lot. . .
Love you!
This post is very helpful and simple:) Wish i had seen this post earlier, i had a headache in trying to figure this one out and after doing what other websites instructed (which is so complicated for my level)
Thank you soooo much :D
thAnXx bRoo
Thank you very much for this. I've tried it out and it was very easy to follow. :)
thnk u very much....it helped me..good work sir
Thank you very much I have just followed through your instructions and succeeded. I
am so grateful. I read an article before which just confused me. Yours was straight to
the point and I have nailed it. Thank you once again
It works! Thanks for the info! :)
many thanks
Comments on this post are closed.